The rise of Kubernetes has significantly simplified the deployment and operation of cloud-native applications. An important part of that experience is the ease of running a cloud-native distributed database like TiDB. TiDB is an open-source, MySQL-compatible “NewSQL” database that supports hybrid transactional and analytical processing (HTAP).
In this tutorial, we’ll discuss how to use the TiDB Operator, a new open-source project by PingCAP to leverage Kubernetes to deploy the entire TiDB Platform and all of its components. The TiDB Operator allows you to monitor a TiDB deployment in a Kubernetes cluster and provides a gateway to administrative duties.
At this point, it’s perhaps a forgone conclusion that Kubernetes is the de facto orchestration engine of cloud-native applications—“Linux of the cloud,” as executive director of the Linux Foundation Jim Zemlin put it. Kubernetes is not just a mature and useful technology, but it holds strategic value for the IT operations of many large companies. At least 54 percent of the Fortune 500 were hiring for Kubernetes skills in 2017.
Inspired by the concept and pattern popularized by CoreOS’s Operator Framework, we began building the TiDB Operator roughly a year ago. Back then, Kubernetes was much less stable or feature-rich, so we had to implement a lot of workarounds to make our Operator… well, operate. With Kubernetes’ dramatic growth in the last year, we refactored our old code to align it with the standard and style of present-day Kubernetes, before open-sourcing the TiDB Operator on GitHub.
Kubernetes’ growing popularity has spawned a large ecosystem of cloud-native applications, as evidenced by the large number of cloud-native projects assembled by the Cloud Native Computing Foundation (CNCF). So where does TiDB fit in all this? Most of these applications can be considered stateless, occupying some core parts of any cloud-native architecture—microservices, service meshes, messaging/tracing/monitoring, etc. However, there is also a place for stateful applications (such as a persistent distributed database). That’s where TiDB fits in.
How to use the TiDB Operator
Let’s dive into how to deploy TiDB using Kubernetes on your laptop, though this can be done on any Kubernetes cluster. Note that this local deployment is only meant to give you a taste of the TiDB Operator for testing and experimentation, not for production use. It’s still undergoing testing by our team and the open-source community. We encourage you to participate.
First, let’s do a quick overview of what is in a TiDB cluster and how that fits with the Kubernetes architecture. Every TiDB cluster has three components:
- TiDB stateless SQL layer;
- TiKV, a distributed transactional key-value storage layer where data is persisted;
- Placement Driver (PD), a metadata cluster that controls TiKV.
In the context of Kubernetes, TiKV and PD maintain database state on disk, and are thus mapped to a StatefulSet with a Persistent Volume Claim. TiDB stateless SQL layer is also mapped to a StatefulSet, but does not make any Persistent Volume Claims.
Install a Kubernetes cluster
This installation has been tested to work on MacOS and Linux, but please note that running Kubernetes on a laptop is a work in progress.
Minikube is a popular option for running Kubernetes on your laptop. However, Minikube only creates one Kubernetes node. To run TiDB, we need multiple Kubernetes nodes. There are a few options for this, but for this tutorial we will use DinD (Docker in Docker).
DinD allows for running the Docker daemon inside a top-level Docker container. This means the top-level container can simulate a Kubernetes node and have containers launched inside it. The kubeadm-dind-cluster project starts multiple Docker containers as a Kubernetes node on a standalone machine through DinD, and then starts a Kubernetes cluster by using Docker to start Kubernetes components on these nodes.
TiDB prerequisites
Before deploying a TiDB cluster to Kubernetes, make sure the following requirements are satisfied:
- Resource requirements: 2+ CPUs, 4GB+ memory
- Docker: 17.03 or later
- Kubectl: 1.10 or later
- Note: The outputs of different versions of Kubectl might be slightly different.
- md5sha1sum
- For Linux, md5sha1sum is already installed by default.
- For MacOS, make sure md5sha1sum is installed. If not, run
brew install md5sha1sumto install it.
Deploy a Kubernetes cluster using DinD
Use DinD to install and deploy a multiple-node Kubernetes cluster:
$ wget https://cdn.rawgit.com/kubernetes-sigs/kubeadm-dind-cluster/master/fixed/dind-cluster-v1.10.sh
$ chmod +x dind-cluster-v1.10.sh
$ CNI_PLUGIN=flannel NUM_NODES=4 ./dind-cluster-v1.10.sh up
Note: If you fail to pull the Docker images due to firewall-related issues, you can try the following method (the Docker images used are pulled from UCloud Docker Registry):
$ git clone https://github.com/pingcap/kubeadm-dind-cluster
$ cd kubeadm-dind-cluster
$ NUM_NODES=4 tools/multi_k8s_dind_cluster_manager.sh rebuild e2e-v1.10
(This bootstrap process will take five to 10 minutes. It’s a good time to grab a cold beverage or do some stretching.)
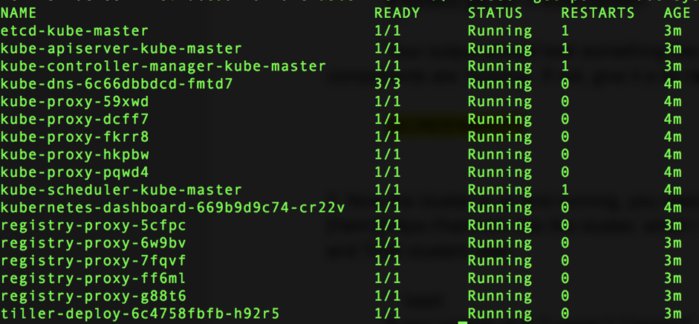
After the DinD cluster bootstrap is done, use the following command to verify the Kubernetes cluster is up and running:
$ kubectl get node,componentstatus
$ kubectl get po -n kube-system
Your output should look something like the following screenshot, where all components are running. If not, give it more time.
IDG
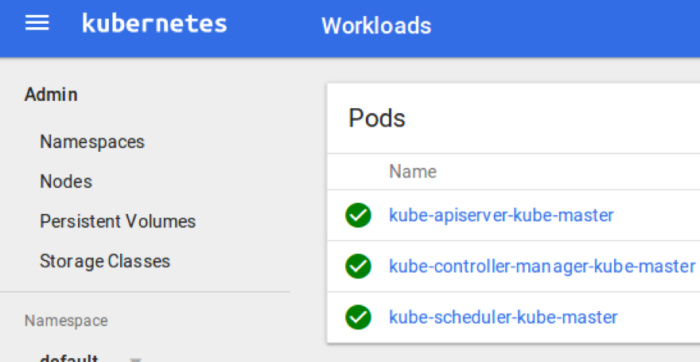
If you would like to view your deployment in Kubernetes dashboard, you can start the proxy with the command:
$ kubectl proxy
Then you can view the dashboard.
 IDG
IDG
Now that the cluster is up and running, you need to install the Kubernetes package manager Helm into the cluster. Helm will be used to deploy and manage the TiDB Operator and TiDB clusters.
$ os=`uname -s| tr ‘[:upper:]’ ‘[:lower:]’`
$ wget “https://storage.googleapis.com/kubernetes-helm/helm-v2.9.1-${os}-amd64.tar.gz”
$ tar xzf helm-v2.9.1-${os}-amd64.tar.gz
$ sudo mv ${os}-amd64/helm /usr/local/bin
$ git clone https://github.com/pingcap/tidb-operator
$ cd tidb-operator
$ kubectl apply -f manifests/tiller-rbac.yaml
$ helm init --service-account=tiller --upgrade
$ kubectl get po -n kube-system | grep tiller # verify Tiller is running; this should take only a few seconds
$ helm version # verify the Helm server is running
Note: If the tiller pod fails to start due to image pull failure because of the firewall, you can replace helm init --service-account=tiller --upgrade with the following command:
helm init --service-account=tiller --upgrade —tiller-image=uhub.ucloud.cn/pingcap/tiller:v2.9.1
Configure local persistent volumes in Kubernetes
LocalPersistentVolume is used to persist the PD/TiKV data. The local persistent volume provisioner doesn’t work out of the box in DinD, so you will need to modify its deployment. And Kubernetes doesn’t support dynamic provisioning yet, so you need to manually mount disks or directories to mount points.
To simplify this operation, use the following scripts to help configure the development environment:
$ # create directories for local volumes, this happens in the tidb-operator directory
$ ./manifests/local-dind/pv-hosts.sh
$ # deploy local volume provisioner
$ kubectl apply -f manifests/local-dind/local-volume-provisioner.yaml
$ # wait for local-volume-provisioner pods to run, which may take a few minutes
$ kubectl get po -n kube-system -l app=local-volume-provisioner
$ # verify pv created
$ kubectl get pv
Your output should look something like this:
 IDG
IDG
Install the TiDB Operator in the DinD Kubernetes cluster
$ kubectl apply -f manifests/crd.yaml
$ # This command creates the custom resource for the cluster that the operator uses.
$ kubectl get customresourcedefinitions
$ # Install the TiDB Operator into Kubernetes
$ helm install charts/tidb-operator --name=tidb-operator --namespace=pingcap
$ # while waiting for operator to run, you can check its status with this command
$ kubectl get po -n pingcap -l app=tidb-operator
![]() IDG
IDG
Deploy a TiDB cluster in the DinD Kubernetes cluster
$ helm install charts/tidb-cluster --name=tidb-cluster --namespace=tidb
$ # you can watch the tidb cluster get created using this ‘watch’ command
$ watch kubectl get pods --namespace tidb -l cluster.pingcap.com/tidbCluster=demo -o wide
Your output should look like this:
 IDG
IDG
$ # you can see all the services available to you now with your tidb cluster deployment and their port number to access them
$ kubectl get service -n tidb
 IDG
IDG
$ # you can see the entire pod with this command
$ kubectl get pod -n tidb
 IDG
IDG
To access the TiDB cluster, use kubectl port-forward to expose the services to host.
Access TiDB using the MySQL client:
- Use Kubectl to forward the host machine port to the TiDB service port:
$ kubectl port-forward svc/demo-tidb 4000:4000 --namespace=tidb
- To connect to TiDB using a MySQL client, open a new terminal tab or window and run the following command:
$ mysql -h 127.0.0.1 -P 4000 -u root
 IDG
IDG
View the monitor dashboard:
- Use Kubectl to forward the host machine port to the Grafana service port:
$ kubectl port-forward svc/demo-grafana 3000:3000 --namespace=tidb
- Point your web browser to http://localhost:3000 to access the Grafana monitoring interface.
- Default username: admin
- Default password: admin
 IDG
IDG
Try scaling and upgrading TiDB
Now that you have a working TiDB cluster deployed using tidb-operator, here are a few features you can try out.
Horizontal scaling in TiDB
You can scale out or scale in the TiDB cluster simply by modifying the number of replicas.
First configure the charts/tidb-cluster/values.yaml file. For example, to scale out the cluster, you can modify the number of TiKV replicas from 3 to 5, or the number of TiDB replicas from 2 to 3.
Then run the following command to apply the changes:
helm upgrade tidb-cluster charts/tidb-cluster --namespace=tidb
Note: If you need to scale in TiKV, the consumed time depends on the volume of your existing data, because the data needs to be migrated safely.
Upgrade TiDB
First configure the charts/tidb-cluster/values.yaml file. For example, change the version of PD/TiKV/TiDB image from v2.0.4 to v2.0.5.
Then run the following command to apply the changes:
helm upgrade tidb-cluster charts/tidb-cluster --namespace=tidb
Destroy the TiDB cluster
When you are done with your test, use the following command to destroy the TiDB cluster:
$ helm delete tidb-cluster --purge
Note: This only deletes the running pods and other resources; the data is persisted. If you do not need the data anymore, run the following commands to clean up the data. (Be careful, this permanently deletes the data.)
$ kubectl get pv -l cluster.pingcap.com/namespace=tidb -o name | xargs -I {} kubectl patch {} -p ‘{”spec”:{”persistentVolumeReclaimPolicy”:”Delete”}}’
$ kubectl delete pvc --namespace tidb --all
Destroy the DinD Kubernetes cluster
If you do not need the DinD Kubernetes cluster anymore, change to the directory where dind-cluster-v1.10.sh is stored and run the following command:
$ ./dind-cluster-v1.10.sh clean
Next steps with TiDB
We hope that you’ve now successfully used the TiDB Operator to launch a TiDB cluster and experienced its seamless compatibility with MySQL. Of course, a cloud-native application is meant for many machines in a large distributed system, not a single laptop, so there are many sides of the TiDB Operator that we couldn’t showcase here.
The TiDB Operator is an important step in TiDB’s ongoing cloud-native journey. However, the TiDB Operator is still a young open-source project. We encourage you to follow its development and help us improve it with your contributions: bug reports, issues, PRs, etc. Here’s a look at the project’s roadmap.
In the future, we will continue to grow with the Kubernetes community, incorporate new features, integrate with hosted Kubernetes services on various cloud platforms, and make the experience of deploying and maintaining TiDB the best it can be. Follow us on Twitter, LinkedIn, Reddit, and stay tuned for more tutorials on how to deploy TiDB in a production-level cloud environment.
Shuan Deng and Greg Weber are cloud product engineers at PingCAP.
—
New Tech Forum provides a venue to explore and discuss emerging enterprise technology in unprecedented depth and breadth. The selection is subjective, based on our pick of the technologies we believe to be important and of greatest interest to InfoWorld readers. InfoWorld does not accept marketing collateral for publication and reserves the right to edit all contributed content. Send all inquiries to newtechforum@infoworld.com.
