In the first post of this series, you learned how to build a Hyperledger Fabric network using Amazon Managed Blockchain. In this post, you deploy and run Hyperledger Explorer to visualize the Fabric network that you created.
Your Hyperledger Fabric network expands as you add new members and gains new business capability as you deploy additional chaincode across new channels. Regardless of your Amazon Managed Blockchain network’s size or complexity, visualization helps you to manage network activity more effectively. As your network matures, visualization tools grow increasingly important.
Hyperledger Explorer is an open-source browser for viewing activity on, and interacting with, the underlying Fabric network. Not only can you see the high-level structure of the network, but you can check the status of each transaction and dive deep into the read/write sets created by each peer during transaction endorsement.
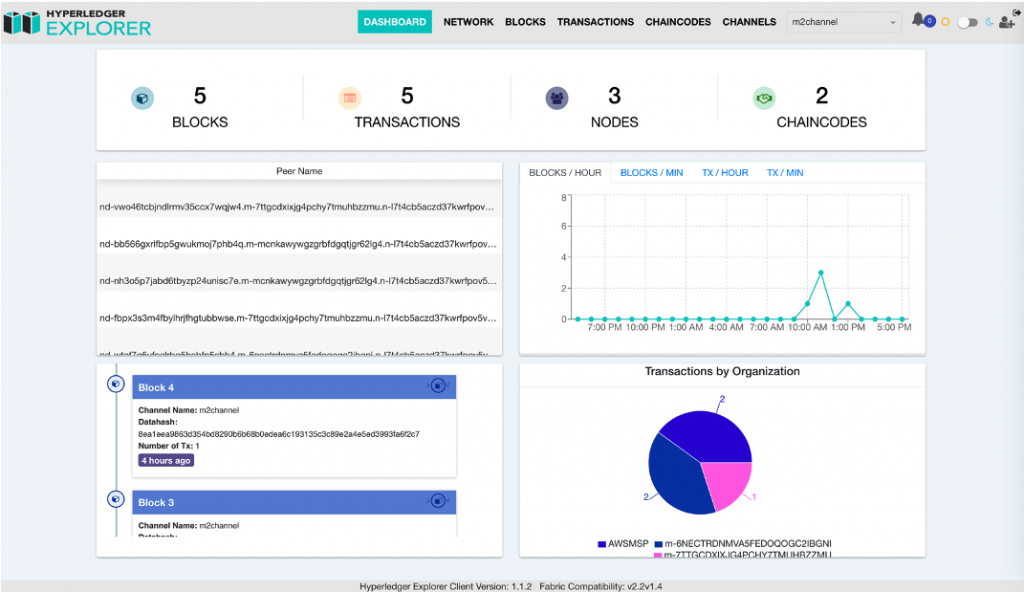
The following is the Hyperledger Explorer dashboard, showing the configuration of the Fabric network (members, channels, chaincode, peers, etc.), as well as the activity taking place on the network (transactions, blocks, etc.).

Architecture overview of Hyperledger Explorer
Hyperledger Explorer consists of several components:
- A React app that provides the dashboard
- A Node.js sync client that regularly reads the Fabric network state and updates this in the PostgreSQL database
- A PostgreSQL database that stores the current state of the Fabric network
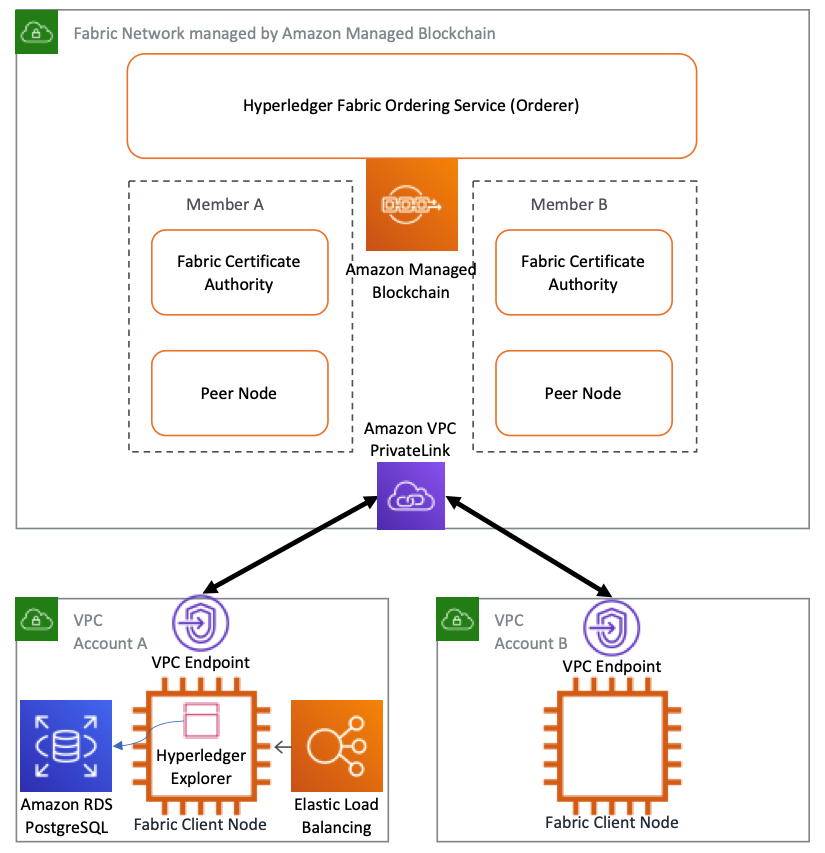
The following diagram shows Hyperledger Explorer running on the Fabric client node, connecting to Amazon Managed Blockchain using the AWS PrivateLink endpoint. An Amazon RDS for PostgreSQL database instance runs in the same VPC as the Fabric client node and receives continuous updates on the state of the Fabric network.
You can access the Hyperledger Explorer endpoint using Elastic Load Balancing. In this post, use a Classic Load Balancer. AWS PrivateLink routes all network traffic between your VPC and your managed Fabric network over the AWS backbone. This routing protects your traffic from public internet exposure, as shown in the following diagram.

Fabric client node
In the first post in this series, the Fabric client node used was a t2.small. In this post, Hyperledger Explorer also runs on the Fabric client node and requires more resources than a t2.small provides. I’ve increased the EC2 instance type to a t2.medium.
If you followed Part 3, you are also running a RESTful API server on the Fabric client node and need the extra capacity. To run Hyperledger Explorer on an existing t2.small Fabric client node, increase the capacity by changing the instance type. This configuration is suitable for a demo environment.
For production, you might want to separate your Fabric client node, used for administering the Fabric network, from applications such as the RESTful API server and Hyperledger Explorer that are accessing the Fabric network.
Prerequisites
Before deploying Hyperledger Explorer, you need an existing Hyperledger Fabric network on Managed Blockchain with at least one member. You can implement this by completing Part 1 in the first post. For more information, see the non-profit-blockchain GitHub repo.
Hyperledger Explorer requires Node.js v12.x or greater. Part 3 installed Node.js on the Fabric client node, though the version of Node.js required by Hyperledger Explorer may differ. For more information about installing Node.js, see the pre-requisites section in the README file. You must also install the PostgreSQL client libraries, as you need these to connect to the Amazon RDS PostgreSQL instance.
Running Hyperledger Explorer on Amazon Managed Blockchain
Complete the following steps to get Hyperledger Explorer running on Amazon Managed Blockchain:
- Clone the appropriate version of the Hyperledger Explorer repository.
- Create the RDS PostgreSQL DB instance used by Hyperledger Explorer.
- Create the Hyperledger Explorer database tables in the PostgreSQL RDS database.
- Create a connection profile to connect Hyperledger Explorer to Managed Blockchain.
- Run Hyperledger Explorer and view the dashboard.
- Use the Swagger Open API Specification UI to interact with Hyperledger Explorer.
For more information about how to carry out each step, see the non-profit-blockchain GitHub repo. Each step listed here has a matching step in the GitHub repo.
Step 1: Clone the appropriate version of the Hyperledger Explorer repository
Go to the Hyperledger Explorer GitHub repo.
Check out the tag aligned to the Hyperledger Fabric version you’re using. You can confirm the appropriate tag from the information in the README. This post uses the tag v1.1.2.
Step 2: Create the Amazon RDS PostgreSQL instance used by Hyperledger Explorer
Use AWS CloudFormation to create an RDS PostgreSQL instance in the same VPC as the Fabric client node. The RDS instance is in a private subnet accessible only from the Fabric client node. The AWS CloudFormation template also creates the load balancer that is used to access the Hyperledger Explorer dashboard.
Step 3: Create the Hyperledger Explorer database tables in the PostgreSQL RDS database
Hyperledger Explorer uses several database tables to store the information it extracts from the Hyperledger Fabric network. In this step, update the Hyperledger Explorer config files with connection details pointing to the RDS PostgreSQL DB instance. Do this before using a shell script to create the tables in the DB instance.
Step 4: Create a connection profile to connect Hyperledger Explorer to Managed Blockchain
Hyperledger Explorer uses a connection profile to connect to the Fabric network. Part 3 used connection profiles to connect the REST API to the Fabric network. The process is similar with Hyperledger Explorer. You generate the connection profile automatically, based on the ENV variables you populated while following the prerequisites section in the GitHub repo.
After generating the connection profile, you build Hyperledger Explorer. This step installs the necessary Node.js packages and runs test cases against Hyperledger Explorer to make sure it is operating correctly.
Step 5: Run Hyperledger Explorer and view the dashboard
The Hyperledger Explorer client starts on port 8080. You already have a load balancer that routes traffic to this port. The load balancer was created for you by the AWS CloudFormation template in Step 2.
After the health checks on the load balancer succeed, you can access the Hyperledger Explorer client using the DNS of the load balancer. You can find the load balancer endpoint using the key BlockchainExplorerELBDNS in the Outputs tab of the AWS CloudFormation stack.
Step 6: Use the Swagger Open API Specification UI to interact with Hyperledger Explorer
Hyperledger Explorer provides a RESTful API that you can use to interact with the Fabric network. Append “api-docs” to the same load balancer endpoint that you used in step 5.
The Swagger home page for the API should then give you a read-only view of the RESTful API. To make this API “live” so that you can interact with it, update the host property in swagger.json, pointing to your load balancer DNS. You will need to authenticate and authorize before using the API. Find instructions to do this in step 6 of the README file. After updating the file, restart Hyperledger Explorer and then navigate to the Swagger URL:
http://<ELBDNS>/api-docs
Conclusion
In this post, you deployed Hyperledger Explorer on the Fabric client node and connected this to a Fabric network in Amazon Managed Blockchain. You used the Hyperledger Explorer dashboard to view channels, chaincode, blocks, and transactions. You also used the Swagger UI to interact with the RESTful API provided by Hyperledger Explorer.
About the author
 Michael Edge is a principal blockchain architect with AWS Professional Services.
