We’re happy to announce that Amazon RDS for SQL Server now fully supports SQL Server Database Mail. Before this release, you needed to use a variety of work-arounds to enable Database Mail, such as using linked servers. With the release of Database Mail for SQL Server, you can enable Database Mail seamlessly by using database parameter groups.
Database Mail is one of the heavily used features in Microsoft SQL Server. Database Mail enables you to send messages from the SQL Server to users by using a Simple Mail Transfer Protocol (SMTP) server. In this post, you learn how to configure Database Mail and send emails from an RDS for SQL Server DB instance via Amazon Simple Email Service (Amazon SES).
Common use cases for Database Mail are:
- Sending text messages
- Sending query results or reports as a text or file attachment
- Sending email notification programmatically inside a procedure or job
For this post, we work with the following AWS services:
- Amazon RDS for SQL Server – Database Mail is supported on Web, Standard, and Enterprise SQL Server editions.
- Amazon SES – We use Amazon SES as our SMTP server. This is just one option; you could alternatively use another SMTP server. If so, skip the following section on setting up Amazon SES.
Setting up Amazon SES
We use Amazon SES as our SMTP server to quickly send emails out. Amazon SES is a cost-effective, flexible, and scalable email service that enables you to send email from within any application. To begin, complete the following steps:
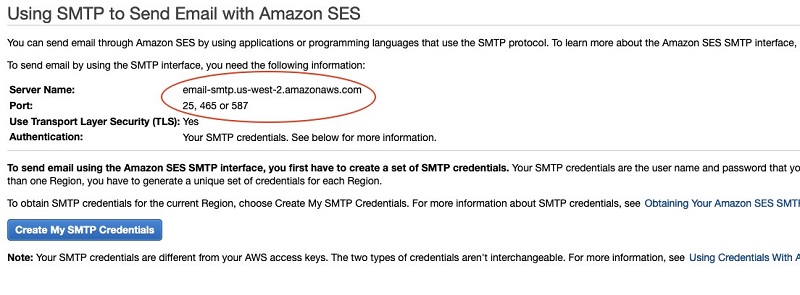
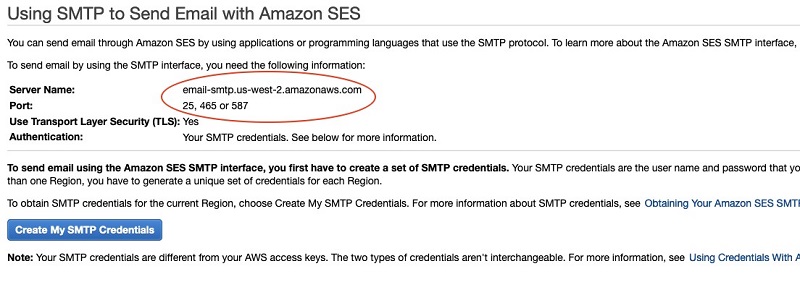
- On the Amazon SES console, choose SMTP Settings.
- Note the values for Server Name and Port.
- Choose Create My SMTP Credentials.

- Enter a name for your AWS Identity and Access Management (IAM) user or leave it as default.
- Choose Create.
- Save the SMTP credentials somewhere safe; this is the only time you can download it.

- On the Amazon SES console, choose Email Addresses.
- Choose Verify a New Email Address.
- Enter an email address that you own to receive a confirmation email.
- After you confirm your email, Verification Status should show as
verified.
At this point, we have all the necessary information about our SMTP server and can start configuring Database Mail.
Setting up Database Mail
Before configuring Database Mail, you first enable it through a database parameter group.
Enabling Database Mail through a database parameter group
Database Mail is enabled on an RDS instance through a database parameter group. In Amazon RDS, parameter groups act as a container for engine configuration values that are applied to one or more DB instances. Each RDS instance comes with an associated default parameter group; however, we can’t modify it. You can either use a new parameter group or an existing created parameter group. If choosing an existing parameter group, it must support your SQL Server instance edition and version. For more information about creating a new parameter group, see Working with DB parameter groups. To enable Database Mail through a parameter group, complete the following steps:
- On the Amazon RDS console, choose Parameter groups.
- Choose the parameter group you want to use.
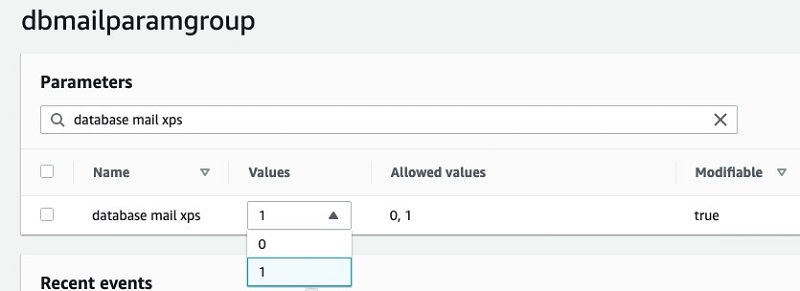
- In the search box, enter database mail xps.

- Choose Edit Parameters to modify the value.
- For Values, choose 1.
- Save your changes.
- On the Amazon RDS console, choose Databases.
- Choose the instance you want to use.
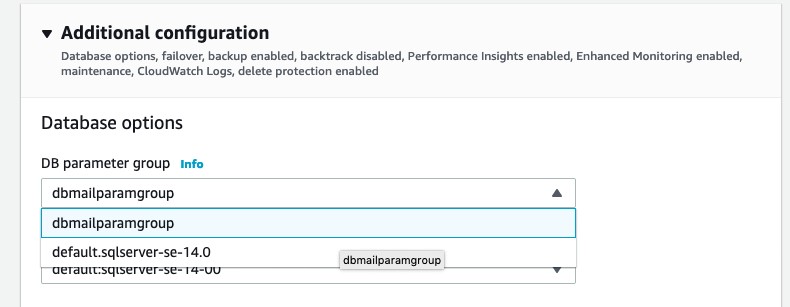
- Choose Modify.
- Under Database options, choose the parameter group that has database mail xps set to 1.

- Choose Continue.
- Under Scheduling of modifications, choose Immediately.
- Choose Modify DB Instance to apply the changes.
Configuring Database Mail
The following diagram illustrates an example Database Mail configuration. User1 has access to Account 1 and Account 2 via Profile 1. User2 has access to all accounts via both profiles. User3 has access to Account 2 and Account 3 via Profile 2.
Before we can use Database Mail, we need to set up a mail configuration.
- Launch SQL Server Management Studio.
- Connect to the SQL Server engine of the RDS instance that Database Mail is enabled for.
- Open a new query.
Use the following stored procedures to create a simple Database Mail configuration.
- Create a Database Mail profile (a profile is a container used to store email accounts). See the following code:
- Add principles to the profile; use
publicso any user can access the profile:
We can grant the permissions on Database Mail objects as needed, but public is fine for now.
- Create the Database Mail account (make sure to enter the correct SMTP credentials):
- Add Database Mail account to the Database Mail profile:
Sending a test email
Run the stored procedure sp_send_dbmail to send an email (see the following code). For the recipient, we can use the Amazon SES simulator to quickly test if sending the email was successful or not. For more testing options, see Using the Mailbox Simulator. We have to repeat the process and verify additional email addresses if we want to send to real recipients.
Then run this stored procedure to see all email items:
Under the sent_status column, verify that the status is sent.

Conclusion
This post showed you how to configure Database Mail with Amazon SES. With the launch of Database Mail for SQL Server, you no longer have to find a work-around to enable and use Database Mail. You can use this solution for any other third-party SMTP server. Try out Database Mail today on the AWS Management Console, and share your thoughts and experiences in the comments.
About the authors
 Andrew Zhou is a Software Development Engineer at Amazon Web Services. He works with the AWS RDS team, focusing on commercial database engines and SQL Server. He enjoys working on technical challenges and is passionate about learning new technologies.
 Chandra Shekar Ramavath is a Database Engineer at Amazon Web Services. He works with the AWS RDS team, focusing on commercial database engines, SQL Server and Oracle.

